


Choosing the right Deck Boards can shape how your outdoor space looks, feels, and performs over time. The best choice depends on more than color or price. Local weather, foot traffic, maintenance habits, and the structure beneath the boards all matter. A sunny backyard may make dark boards uncomfortable under bare feet, while a damp, shaded area may need careful attention to drainage and ventilation. Small details count.
Materials bring different trade-offs. Pressure-treated lumber is often accessible, but it may need regular sealing and can change shape as it dries. Composite boards can reduce routine upkeep, though their surface temperature, appearance, and installation requirements vary by product. Cedar and other naturally durable woods offer a distinct grain, but they still need care. No option is maintenance-free.
Before deciding, compare samples in natural light and check the manufacturer’s installation and care guidance. Look at board spacing, fasteners, joist support, slip resistance, and warranty terms. Ask how each material handles scratches, fading, moisture, and seasonal temperature changes. Then consider the cost across several years, not only the purchase price. That estimate can be imperfect; real wear depends on use and exposure. It is worth revisiting.
These ten tips will help you weigh practical details alongside appearance, so your deck suits your home and the way you use it. A little planning now can prevent avoidable repairs later.
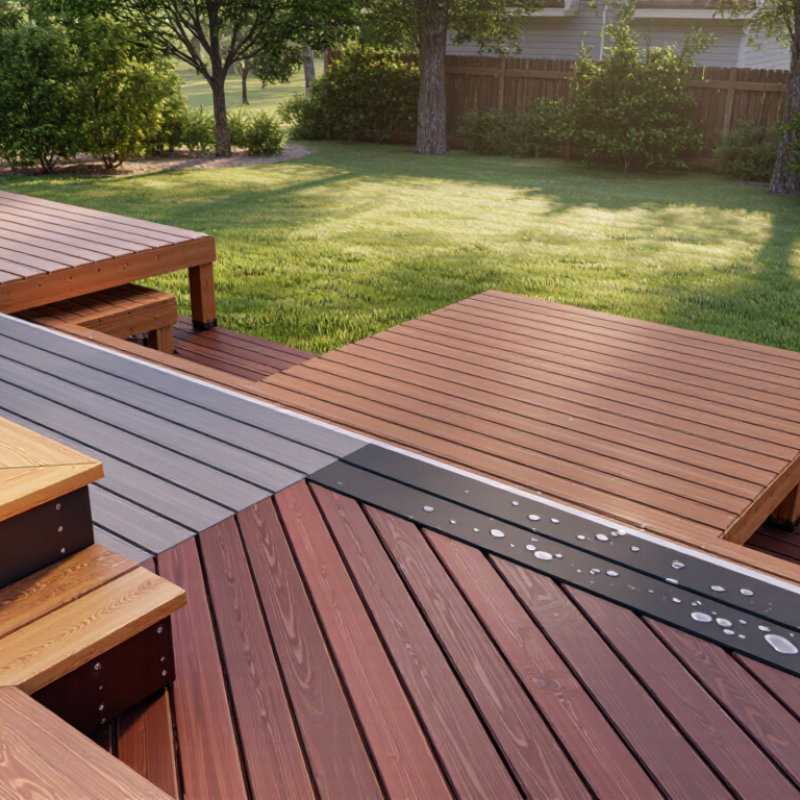
Before comparing deck boards, decide how the deck will actually be used. A quiet sitting area has different demands from a busy space with dining chairs, pets, and frequent foot traffic. For an outdoor kitchen, consider how grease or dropped food will be cleaned from the surface. If people often walk barefoot, feel sample boards underfoot and check for splinters, rough edges, or excessive heat. Small details matter.
Climate can change how a board performs over time. Strong afternoon sun may fade colors and make surfaces hot, while regular rain and humidity can make drying and ventilation especially important. In freeze-thaw regions, trapped moisture may worsen wear. Salt air can also affect nearby metal fasteners. Shade helps, but it may keep boards damp longer. No material escapes every trade-off.
Look closely at the site, not just the forecast. Note where water collects after rain, where trees drop leaves, and whether the deck sits close to the ground. Poor drainage and limited airflow can invite persistent dampness. Check the board’s installation guidance for required joist spacing and clearance; these details vary by product type. A board that looks ideal in a small sample may feel different across a sunny, exposed deck. Even careful planning can miss a seasonal problem, so consider how the space changes through the year.

Use these qualitative planning scores to compare factors before choosing a decking material. Higher scores indicate factors that generally deserve more attention; the best choice depends on your project and local conditions.
Consider how the deck will be used, then account for moisture, sun exposure, drainage, and upkeep. These scores are a practical planning guide, not laboratory test results; check local building requirements and product specifications.
Choosing deck boards starts with comparing how each material behaves outdoors. Pressure-treated wood is usually budget-friendly and easy to cut, but it needs regular cleaning and protective finishes. Cedar and other naturally durable woods offer visible grain and a warm feel. They can weather unevenly, though, especially where sun and rain hit different areas.
Composite boards combine wood fibers and recycled plastics, often reducing routine staining. Their color and surface texture vary, so inspect a sample in daylight and after it gets wet. Some boards feel warmer underfoot in direct sun. PVC boards resist moisture well and are relatively easy to clean, but their appearance may feel more uniform than real wood. No option stays perfect.
Profiles affect both installation and appearance. Grooved edges hide fasteners with compatible clips, creating a clean surface; square edges usually accept face screws and work well at borders. Wider boards can make a small deck look calmer, while narrow boards add visual rhythm. Look closely. Check the required joist spacing and fastening method for the exact board you choose. A small sample can mislead: full-length boards may make color variation more noticeable. Compare materials, profiles, and finish together before deciding.
A deck board should suit the weather and the way people use the space. Check the manufacturer’s published information for moisture resistance, expected service life, and installation requirements. In damp climates, boards that absorb water may swell, warp, or encourage decay if they are not maintained. Composite boards can reduce some routine upkeep, but heat, surface wear, and fading still vary by product. Ask for samples. A small sample can reveal texture and color, though it cannot show how a full deck will age.
Safety deserves a close look. Wet leaves and algae can make many surfaces slippery, so consider drainage, shade, and cleaning access alongside board texture. Look for splinters, raised edges, and gaps that could catch a shoe or cane. Follow spacing and fastening guidance; boards need room to expand and contract. I once underestimated how much afternoon sun changed a dark sample’s feel. It was a small test, but a useful one.
Maintenance is not just a yearly chore; it affects long-term cost and safety. Some wood boards need periodic cleaning, sealing, or staining, while other materials may only need washing. Check whether cleaners are suitable for the surface, and avoid assuming that a low-maintenance board needs no care. Keep a short record of inspections. Note loose fasteners, trapped debris, and changes in color. I still find maintenance estimates easy to underestimate, especially around railings and stairs.
Before buying deck boards, measure the frame, not just the deck’s outside edges. Real framing is rarely perfectly square. Check joist spacing, board width, thickness, and finished length, then allow for end gaps and trimming. The American Wood Council’s DCA 6 prescriptive deck guide specifies joists no more than 16 inches apart for 5/4-inch wood decking, or 24 inches for 2x6 decking. Those figures apply to the guide’s stated conditions; confirm the board’s span rating and local requirements before installation. Small mismatch, big bounce.
Compatibility matters as much as size. Solid wood, capped composite, and PVC boards may require different fasteners, edge clearances, and ventilation. Check whether grooved boards fit the specified hidden clips, and whether the framing can accept the recommended screw pattern. Boards laid diagonally often need closer joist spacing than boards laid perpendicular. Follow the product’s installation instructions rather than assuming familiar spacing will work. Leave room for movement, too: boards can expand or shrink with temperature and moisture. A dry board measured on a garage floor may behave differently after a wet season. I would recheck the layout at the site; that extra measurement can prevent awkward cuts at the stairs.
| Tip | Board dimensions or profile | Compatibility check | Installation need |
|---|---|---|---|
| 1. Measure the framing first | Common nominal 5/4 × 6 decking measures about 1 × 5½ inches; nominal 2 × 6 lumber measures about 1½ × 5½ inches. | Compare actual board thickness and width with the existing joist height, fascia, and stair details. | Confirm finished height and edge alignment before ordering; nominal sizes are not actual dimensions. |
| 2. Match board span to joist spacing | Decking thickness, profile, and material affect allowable support spacing. | Check the selected board’s span table; composite products can have different limits from wood boards. | Measure joists center to center. Many installations use 16 inches on center for perpendicular boards, but product instructions may require closer spacing, especially for diagonal layouts. |
| 3. Choose a profile that fits the layout | Boards are commonly available with grooved or square edges; widths and thicknesses vary by material and product. | Grooved edges require compatible hidden fasteners; square edges are typically suited to face fastening or specified edge details. | Plan the perimeter, stairs, and picture-frame borders so the required edge profile is available where needed. |
| 4. Check fastener compatibility | Fastener type and length depend on board thickness, joist material, and fastening method. | Use fasteners approved for the decking material. For pressure-treated lumber, select corrosion-resistant connectors and fasteners suitable for the treatment and exposure conditions. | Follow the board and fastener instructions for edge distance, penetration, and fastening pattern; avoid overdriving screws. |
| 5. Allow for drainage and board gaps | Board spacing varies with material, moisture content, temperature, and installation system. | Wood can shrink as it dries; many manufactured boards expand and contract with temperature changes. | Use the product’s spacing instructions and maintain drainage gaps. Do not assume one gap works for every board or climate. |
| 6. Plan butt joints and board lengths | Available lengths differ by material; longer boards can reduce the number of end joints. | Each board end at a joint needs adequate support, and some systems specify end-to-end gap requirements. | Add blocking or use a suitable double-joist arrangement where joints meet. Stagger joints where practical and follow the layout instructions. |
| 7. Account for board movement | Long boards are more affected by lengthwise movement than short pieces, especially with temperature-sensitive materials. | Expansion and contraction allowances are product-specific and may depend on installation temperature. | Check end gaps, butt-joint details, and perimeter clearance in the installation guide before cutting or fastening. |
| 8. Select a surface suited to the site | Surface texture and profile differ across wood, capped composite, and other decking materials. | Consider expected moisture, shade, foot traffic, and maintenance needs; surface performance varies by product and conditions. | Keep the deck free of debris and provide drainage and ventilation beneath it as required by the design. |
| 9. Check cutting and finishing requirements | Some boards can be field-cut; edge finishing and permitted routing vary by product. | Confirm which blades, end treatments, and edge details are allowed for the selected material. | Use suitable eye and respiratory protection when cutting. Follow the product instructions for exposed ends and finished edges. |
| 10. Verify code and structural requirements | Deck-board selection does not replace requirements for joists, beams, stairs, guards, or connections. | Local building rules and approved product instructions may set limits for spans, fastening, and use. | Check local requirements and the current installation guide. Have structural or permit questions reviewed by the appropriate building professional. |
Choosing deck boards is a budget decision that continues after installation. Pressure-treated wood usually costs less upfront, while composite boards can reduce routine staining and sealing. Yet the cheapest board is not always the cheapest project. Compare the full quote, including framing changes, fasteners, delivery, and waste.
A 2024 Remodeling Cost vs. Value report estimated:
a U.S. wood deck addition at $17,615, with $14,596 in resale value, or 82.9% of its cost.
Its composite deck estimate was $25,096, with $16,498 in resale value, or 65.7%.
These are project-level national averages, not a promise about board prices or your home. Still, they show why upfront cost and resale value are different measures.
Availability can change the calculation. Ask local suppliers for current stock, lead times, and prices for the exact board length and color you want. Check twice. A board listed online may not be available nearby, and special orders can delay framing or leave you mixing batches. Confirm that matching replacement boards are likely to remain accessible, too. That detail is easy to overlook. Compare quotes in the same week, since freight and seasonal demand can shift totals. I would not treat one estimate as final; local conditions often make national averages feel distant. Choose a material you can afford now, maintain comfortably, and actually source before the build begins.


For those larger-sized parts, or smaller quantity runs, we have 2 independent powder coat booths and ovens. The quality, durability and affordability of today’s powder coating finishes make this the process of choice for world-class companies.
Powder coating advantages over other forms of coating are many. Materials used in the Powder coating process can be metals and non-metals that come in a multitude of thicknesses, textures, colors, etc. Another of Powder coating’s biggest advantages over conventional coatings is its ability to create finishes in many different textures. Powder Coating Booths allow us the ability to apply these advantages to large products.
Tri-State Fabricators runs a full-service conveyor line for painting. Wet painting can provide protection or decoration to many different part styles. From start to finish, every project is easier to undergo random and point-based inspection by our skilled painting team.
Advantages to our Wet Paint Line are these lines start with product prep and ends with a thorough inspection of a high quality finished product. Our ability to complete large and small projects with a superior finish and doing so in a timely and economical fashion. This passes along the savings in production to our customers. When powder coating ins not an option, our Wet Paint Line gets the job done right the first time.
When the parts get big and heavy we roll-out our custom paint racks and oversize booth. By utilizing our partnerships with all the major paint brands, we can match virtually any color with wet paint.
The advantages of having access to a Wet Paint Booth are many. Large projects of many different shapes can be loaded into the booth. The Wet Paint Booth offers an environment that is much more controlled than a typical parts painting operation.
Not only are they used because of their controlled environment, but they’re are also advantageous when it comes to applying paint to parts that are needed in industries that require specialty coatings such as medical, aerospace, etc.
Our military forces have some very high standards when it comes to the finish of their vehicles and equipment. From the first pre-treatment step to final coat, it takes a great deal of knowledge and experience to protect the men and women of our armed forces. They deserve only the best, and Tri-State Fabricators provides it.
All of our processes are closely monitored by our staff and management teams. Both of which are highly trained in the processes of metal fabrication and finishing. Tri-State Fabricators’ goal is to always fully satisfy each and every customer, including the military. We will always put a 110% into what we do.
Abrasive media blasting is an excellent way to remove old paint, rust, and increase the paint/powder adhesion. Glass beads produce a much smoother and brighter finish than angular abrasives; leaving the part clean yet without any dimensional change. Chemically inert and environmentally friendly, we can recycle our beads approximately 30 times; making them a more preferred method of metal cleaning or surface finishing.
Advantages to Glass Bead Blasting are many. Glass bead blast media is used when a project is needing rough surfaces need to become smooth for applications of coatings such as paint. It is typically used to clean paint and rust from a product surface without deforming the surface it is being used on. Overall, compared to many other blasting media, Glass Bead Blasting is a very economical choice and those savings are always passed on to our customers.
Tri-State Fabricators utilize a zinc phosphate wash to clean and etch the material to ensure the best paint adhesion possible. The unique design of our 3-stage wash system does the work like a 5-stage. From Cleaning and rinsing to conversion coating and post-treatment, Our Part Washing process is a complete service and works throughout the fabrication service and the finishing service.
Along with the previously mentioned benefits, Curing is a vital chemical reaction that leaves the product finish hard and relatively safe from mild abrasion and aggressive corrosion. This process can be done in more than one way; ambient air-dry or in curing ovens at temps that exceed 240°.
From fixing paint mistakes (someone else’s of course) to simply cleaning our paint line hooks, our burn-off oven is put to good use. After a quick burn-off, a little clean up, and a fresh coat of paint, your parts will look better than new.
Why does our Burn-Off Oven work so well? Because super heating the air around parts turns the materials into ashes. From paint and powder coatings to rubber and machining oils, high temps do the job without degrading the integrity of the part.
Masking is a vital part of producing high quality products. We have die-cut masking patterns to protect machined surfaces as well as a wide range of plugs and caps to protect threaded holes and bolts. We provide permanent and temporary masking.
Masking allows the selected sections of a product to be protected from a fabrication or finishing service. This can be with both chemicals when etching and tapes, paints when only finishing just a section of the product. Masking is great in aiding the customization process of a project.
Screen printing is a photographic process that transfers artwork onto a porous nylon screen which allows colored ink to flow through the screen and be deposited on an aluminum or plastic component. We can generally have just about any design created onto a screen for your parts.
Some of the advantages of Screen Printing are, brand recognition for your business displaying on your products, assembly instructions, product warnings/hazards, etc. Tri-State Fabricators produces Screen Printing of the highest quality so you know it’s durable.
Metal Finishing is the art of treating the exterior portion of product, often metal but can also be made of other materials, so that the surface is clean and free of any debris. Then the process of applying coats or either paint of powder coat takes place. This coating process improves the quality of the product in both appearance and resistance to wear and corrosion.
Tri-State Fabricators, Inc., understands that a project typically isn’t complete until a high-quality finish has been added to your product. This is why our painting and powder coating teams continuously inspect the products throughout the Metal Finishing process.

