


7 Tips for Buying the Best Welding Positioners?

Choosing the right Welding Positioners can make a welding station safer, more consistent, and easier to manage. The best choice depends on the work, not just the machine’s advertised capacity. A compact positioner may suit small brackets, while a large assembly needs a stable table, suitable rotation, and enough clearance. Small details matter.

These seven tips focus on practical checks: load rating, workpiece balance, table size, tilt range, rotation speed, controls, and maintenance support. Pay close attention to the workpiece’s center of gravity. A part can weigh less than the rated limit and still place uneven strain on the fixture. That is easy to overlook. Compare specifications with the actual assemblies you weld, including clamps and fixtures, and ask the supplier about operating limits. When possible, test a representative part before committing.

Think about the operator’s reach, visibility, and access to controls, too. Smooth positioning can reduce awkward handling, but it does not replace sound workholding or appropriate training. Check whether the drive offers useful speed control, whether components are easy to service, and whether the manufacturer provides clear documentation. There is no perfect setup for every shop. A positioner that works well for one job may be inconvenient for another. Use these tips to compare options carefully and choose equipment that fits your workload, workspace, and verified requirements.
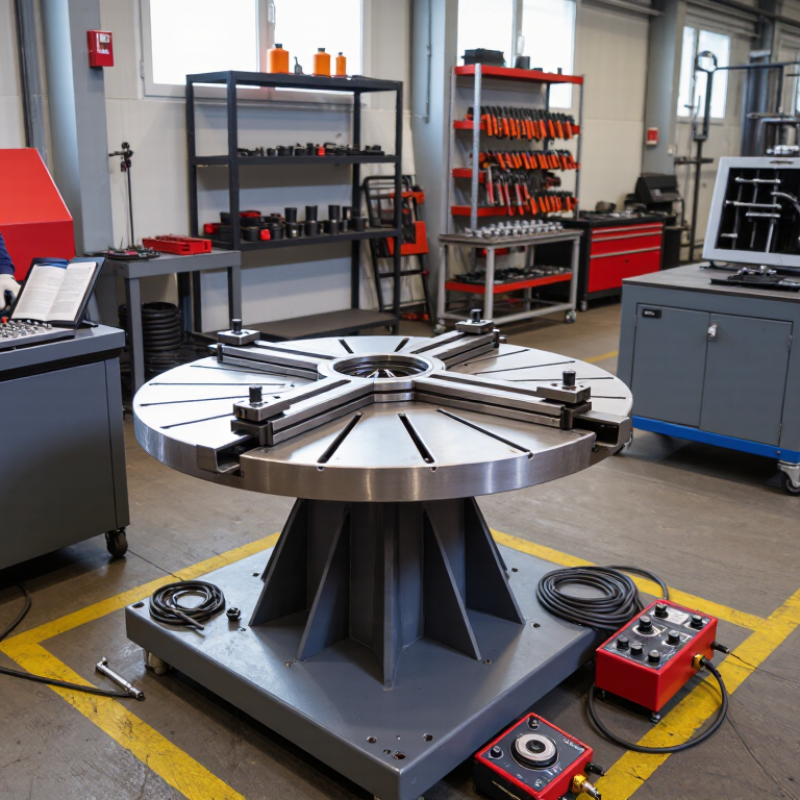
7 Tips for Buying the Best Welding Positioners?

Size Rated Payload by Workpiece Mass, Center of Gravity, and Load Moment (kg·m)

A positioner’s rated payload is not a safe selection shortcut. Weigh the workpiece with clamps, backing bars, and fixtures included. Then locate its center of gravity relative to the rotation axis. For example, a 180 kg assembly with its center of gravity 0.45 m from the axis creates a static moment of 81 kg·m, or about 795 N·m. The mass rating alone misses this turning load. Check the supplier’s moment rating in matching units.

Allow for movement, too. Starting, stopping, and changing tilt can raise loads beyond the static calculation, especially with an offset workpiece. Use the machine’s stated limits for payload, center-of-gravity offset, and overturning moment; do not assume one rating replaces another.

ISO 12100:2010 calls for machinery risk assessment, while the AWS Welding Handbook provides practical context on welding setup and work handling. Treat both as guidance, not a substitute for the positioner’s technical data.

A useful check: sketch the assembly and mark its axis. Small detail, big effect. Recheck the estimate when the fixture changes; that step is easy to miss, and the calculation may still be imperfect if the actual center of gravity is uncertain.


Compare Tilt Range (Often 0–135°) and Rotation Speed (rpm) with Weld Needs

A 0–135° tilt range is common, but the number alone can mislead. ISO 6947:2011 defines standard welding positions, including PA (flat) and PF (vertical-up). Use that framework to check whether the positioner can bring your joint into a workable position. A broad tilt range helps with awkward parts, yet it does not guarantee safe operation at every angle. Confirm the rated load and centre-of-gravity limits in the equipment data.

Rotation speed matters just as much. Compare rpm at the actual workpiece load, not only the machine’s unloaded maximum. Slow, steady rotation can help maintain a consistent travel speed on long circumferential welds; excessive speed may make starts and stops harder to control. Match the control range to your process, part diameter, and welding procedure. A single “best” rpm does not exist.

Tip: Before buying, test a representative part. Check tilt clearance, stopping control, and whether the work stays balanced through the full turn. Take notes. A wide range looks attractive on paper, but setup time and awkward access can still cause trouble. Recheck the supplier’s load chart for off-centre parts; rated capacity can change with the load position.

7 Tips for Buying the Best Welding Positioners? — Compare Tilt Range (Often 0–135°) and Rotation Speed (rpm) with Weld Needs
Tip What to Compare Practical Buying Guide Why It Matters
1. Match tilt range to weld access Tilt angle and available locking positions A 0–135° range is common on many tilting models, but ranges vary. Check whether the workpiece can reach the required angle without interfering with the table, fixture, or floor. More useful positioning can improve access and reduce awkward welding positions; the stated range alone does not guarantee clearance.
2. Choose rotation speed for the process Variable speed range in revolutions per minute (rpm) For many circumferential welding tasks, a low, adjustable speed—often around 0.1–1 rpm—is a useful starting point. Confirm the actual range and low-speed stability for the intended process and part diameter. The appropriate travel speed depends on weld procedure, part size, and operator requirements; an rpm rating is not a substitute for checking linear travel speed at the weld.
3. Size capacity for the real load Rated load, load position, and center of gravity Compare the complete workpiece-and-fixture weight with the manufacturer’s capacity chart. Check any reduced limits for off-center or extended loads rather than relying on the headline capacity alone. An eccentric load can create greater overturning forces than a centered load of the same weight.
4. Check table size and clearance Table diameter, mounting pattern, and surrounding envelope Confirm that the fixture fits the table and that the part clears the machine, floor, and nearby equipment throughout the full rotation and tilt range. A workpiece may fit on the tabletop yet collide with the frame or floor when tilted.
5. Evaluate control and repeatability Speed control, direction, stopping, and positioning Look for smooth low-speed operation, accessible controls, and a clearly specified method for stopping or holding the table. Consider whether repeatable settings are needed for recurring jobs. Stable control helps maintain consistent movement and makes setup easier across repeated welds.
6. Review duty cycle and operating environment Motor duty rating, heat, dust, and welding spatter exposure Match the specified duty cycle to production demands. Check protection and maintenance requirements for the actual shop environment, including exposure to spatter and grinding dust. A unit suited to occasional use may not be appropriate for sustained production operation.
7. Confirm installation and safety requirements Power supply, mounting, guarding, and safe load handling Verify electrical requirements, floor or bench mounting, lifting points, and the safe procedure for loading and securing the workpiece. Follow the equipment manual and site safety rules. Correct installation and secure fixturing are essential when rotating or tilting heavy workpieces.

Note: Tilt and speed figures are general selection guidance, not universal specifications. Confirm capacity, speed range, tilt range, and operating limits in the current manufacturer documentation for the specific model.

Check Table Diameter, Eccentric-Load Limits, and Drive Torque (N·m)

A welding positioner should fit the work, not just the workshop floor. Measure the largest assembly, then compare it with the table diameter and clearance around clamps. A 600 mm table may suit a compact bracket, while a wide frame can overhang or collide with the headstock. Leave room for fixtures and torch access. Small details matter.

Tip: Check eccentric-load limits as carefully as rated capacity. The center of gravity may sit off-center, especially with long pipes or uneven fabrications. Ask for the allowable offset and load chart at your planned tilt angle; capacity can decrease as the part leans. Include the jig when weighing the work. That detail is easy to miss.

Tip: Match drive torque, listed in N·m, to the turning demand. Torque helps rotate an off-center part smoothly, but it is not the same as table capacity. Check the rating across your intended speed range, and look for controlled starts and stops. Test with a representative load if possible. Measure twice. Record table diameter, offset, total weight, and required torque before comparing positioners.

Assess Machine Safety with ISO 12100 and ISO 13849-1 Requirements

Before buying a welding positioner, inspect how its risks are assessed—not just its load capacity. ISO 12100 calls for identifying machine limits, hazards, and suitable risk-reduction measures. On a shop floor, check the rotating table, tilt axis, chuck, cables, and foot pedal. Could a glove, sleeve, or fixture enter a pinch point? Can the operator reach an emergency stop without leaning across the workpiece? Small details matter.

ISO 13849-1 addresses safety-related control systems. Ask the supplier for the risk assessment, the required performance level (PLr), and evidence that the safety functions achieve the required level. Check how the system responds to a failed sensor, lost power, or an activated stop. The ILO’s 2023 global estimates report 395 million non-fatal work injuries each year. That figure covers many industries, not positioners alone, but it underlines why safeguards deserve scrutiny. A checklist helps. It is not proof. Review the documents, then observe a test under realistic operating conditions; awkwardly placed stops can look fine on paper and fail in daily use.

Compare Positioning Accuracy, Duty Cycle, and Service Support Before Buying

Before buying a welding positioner, compare stated accuracy with repeatability under load. A unit that turns smoothly when empty may drift with an off-center fixture. Ask for measured rotation and tilt tolerances, plus the rated payload at your intended reach. Bring a representative jig if possible. Watch a full revolution, then check whether a marked point returns to its starting position. Small errors matter. They can shift a seam and require extra grinding.

Check whether the duty-cycle rating covers continuous rotation, intermittent tilting, or both, and note the specified load. A unit near its limit may pause or heat up during long welds. Match the rating to your actual shift pattern, not a brief demonstration. Service support matters just as much. Ask about response times, replacement controls, troubleshooting help, and installation assistance. Get the terms in writing. A strong warranty is less useful if a failed foot pedal leaves the machine idle for weeks. Compare likely downtime, not just purchase price. Operators should also test the pendant while wearing gloves. It is easy to overlook. A polished test run can hide awkward controls.

Powder Coat Booths

For those larger-sized parts, or smaller quantity runs, we have 2 independent powder coat booths and ovens. The quality, durability and affordability of today’s powder coating finishes make this the process of choice for world-class companies.

Powder coating advantages over other forms of coating are many. Materials used in the Powder coating process can be metals and non-metals that come in a multitude of thicknesses, textures, colors, etc. Another of Powder coating’s biggest advantages over conventional coatings is its ability to create finishes in many different textures. Powder Coating Booths allow us the ability to apply these advantages to large products.

Wet Paint Line

Tri-State Fabricators runs a full-service conveyor line for painting. Wet painting can provide protection or decoration to many different part styles. From start to finish, every project is easier to undergo random and point-based inspection by our skilled painting team.

Advantages to our Wet Paint Line are these lines start with product prep and ends with a thorough inspection of a high quality finished product. Our ability to complete large and small projects with a superior finish and doing so in a timely and economical fashion. This passes along the savings in production to our customers. When powder coating ins not an option, our Wet Paint Line gets the job done right the first time.

Wet Paint Booths

When the parts get big and heavy we roll-out our custom paint racks and oversize booth. By utilizing our partnerships with all the major paint brands, we can match virtually any color with wet paint.

The advantages of having access to a Wet Paint Booth are many. Large projects of many different shapes can be loaded into the booth. The Wet Paint Booth offers an environment that is much more controlled than a typical parts painting operation.

Not only are they used because of their controlled environment, but they’re are also advantageous when it comes to applying paint to parts that are needed in industries that require specialty coatings such as medical, aerospace, etc.

Military CARC

Our military forces have some very high standards when it comes to the finish of their vehicles and equipment. From the first pre-treatment step to final coat, it takes a great deal of knowledge and experience to protect the men and women of our armed forces. They deserve only the best, and Tri-State Fabricators provides it.

All of our processes are closely monitored by our staff and management teams. Both of which are highly trained in the processes of metal fabrication and finishing. Tri-State Fabricators’ goal is to always fully satisfy each and every customer, including the military. We will always put a 110% into what we do.

Glass-Bead Blasting

Abrasive media blasting is an excellent way to remove old paint, rust, and increase the paint/powder adhesion. Glass beads produce a much smoother and brighter finish than angular abrasives; leaving the part clean yet without any dimensional change. Chemically inert and environmentally friendly, we can recycle our beads approximately 30 times; making them a more preferred method of metal cleaning or surface finishing.

Advantages to Glass Bead Blasting are many. Glass bead blast media is used when a project is needing rough surfaces need to become smooth for applications of coatings such as paint. It is typically used to clean paint and rust from a product surface without deforming the surface it is being used on. Overall, compared to many other blasting media, Glass Bead Blasting is a very economical choice and those savings are always passed on to our customers.

Part Washing

Tri-State Fabricators utilize a zinc phosphate wash to clean and etch the material to ensure the best paint adhesion possible. The unique design of our 3-stage wash system does the work like a 5-stage. From Cleaning and rinsing to conversion coating and post-treatment, Our Part Washing process is a complete service and works throughout the fabrication service and the finishing service.

Along with the previously mentioned benefits, Curing is a vital chemical reaction that leaves the product finish hard and relatively safe from mild abrasion and aggressive corrosion. This process can be done in more than one way; ambient air-dry or in curing ovens at temps that exceed 240°.

Burn-Off Oven

From fixing paint mistakes (someone else’s of course) to simply cleaning our paint line hooks, our burn-off oven is put to good use. After a quick burn-off, a little clean up, and a fresh coat of paint, your parts will look better than new.

Why does our Burn-Off Oven work so well? Because super heating the air around parts turns the materials into ashes. From paint and powder coatings to rubber and machining oils, high temps do the job without degrading the integrity of the part.

Masking

Masking is a vital part of producing high quality products. We have die-cut masking patterns to protect machined surfaces as well as a wide range of plugs and caps to protect threaded holes and bolts. We provide permanent and temporary masking.

Masking allows the selected sections of a product to be protected from a fabrication or finishing service. This can be with both chemicals when etching and tapes, paints when only finishing just a section of the product. Masking is great in aiding the customization process of a project.

Screen Printing

Screen printing is a photographic process that transfers artwork onto a porous nylon screen which allows colored ink to flow through the screen and be deposited on an aluminum or plastic component. We can generally have just about any design created onto a screen for your parts.

Some of the advantages of Screen Printing are, brand recognition for your business displaying on your products, assembly instructions, product warnings/hazards, etc. Tri-State Fabricators produces Screen Printing of the highest quality so you know it’s durable.

Metal Finishing

Metal Finishing is the art of treating the exterior portion of product, often metal but can also be made of other materials, so that the surface is clean and free of any debris. Then the process of applying coats or either paint of powder coat takes place. This coating process improves the quality of the product in both appearance and resistance to wear and corrosion.

Tri-State Fabricators, Inc., understands that a project typically isn’t complete until a high-quality finish has been added to your product. This is why our painting and powder coating teams continuously inspect the products throughout the Metal Finishing process.
