


7 Tips for Buying a Front Motorcycle Spoke Wheel?

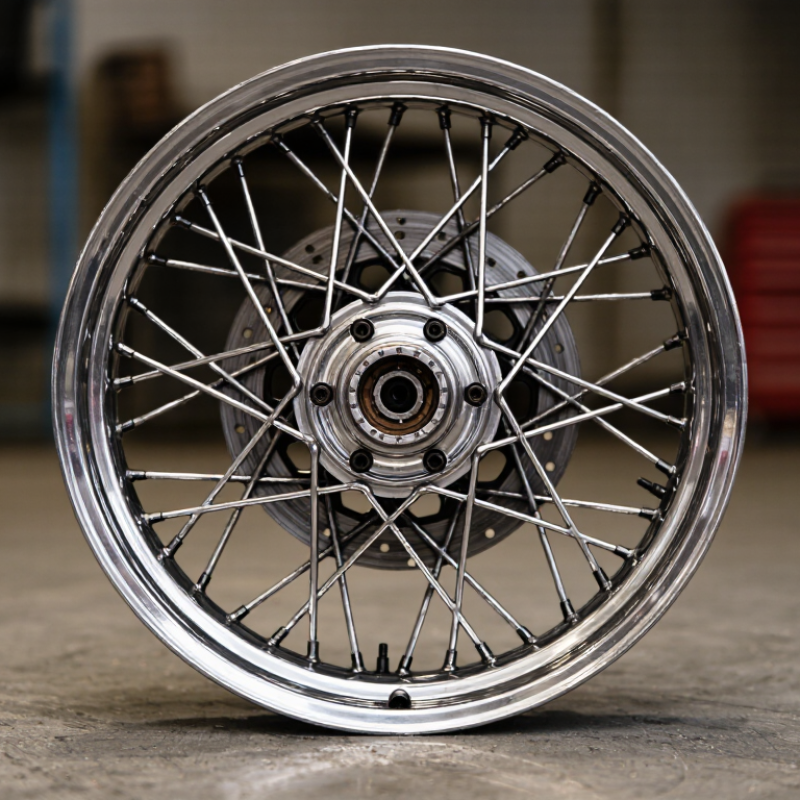
Choosing a Front Motorcycle Spoke Wheel is about more than appearance. The wheel must suit your motorcycle, riding conditions, and maintenance habits. A polished rim may catch your eye, but spoke condition, hub fit, rim dimensions, and build quality matter more on the road. Small details count.

In this guide, motorcycle wheel-building specialist Alex Rowan offers a practical rule: “Check fitment and spoke condition before you judge a wheel by its shine.” Use that advice as a starting point, not a substitute for your motorcycle’s specifications or a qualified mechanic’s inspection. A wheel that looks correct can still have the wrong dimensions or mounting details. Check the manufacturer’s requirements, inspect for corrosion and damage, and ask how the wheel was assembled and tested.

The seven tips ahead cover compatibility, materials, spoke quality, hub and rim condition, seller information, and ongoing care. Look closely at the spoke nipples and rim edges; that is where wear or damage may be easy to miss. Ask direct questions, and request clear photos when buying remotely. Not every listing will provide complete details. That should make you cautious, not rushed. A careful choice can improve confidence and help avoid costly fitment surprises, though no checklist replaces hands-on inspection.
7 Tips for Buying a Front Motorcycle Spoke Wheel?

Start with OEM Fitment: Axle Diameter, Hub Width, Bearings, and Brake Offset

Tip 1: Start with the original equipment specifications for your motorcycle. Check axle diameter, hub width, and bearing dimensions before choosing a front spoke wheel. Bearing measurements include the inner diameter, outer diameter, and width. Small differences matter. Compare the figures with your service manual or a trusted parts reference, not just a seller’s fitment list. A wheel can look correct and still sit poorly on the axle.

Tip 2: Measure brake offset carefully. It is the distance from the hub’s reference face to the brake rotor mounting surface. Incorrect offset can leave the rotor misaligned with the caliper. Check rotor diameter and mounting pattern, too. After fitting, confirm that the wheel turns freely and the brake sits squarely. A quick visual check helps, but it cannot replace accurate measurement.

Tip 3: Verify spacer placement and fork clearance before riding. Use the specified axle and spacer arrangement, then tighten fasteners to the motorcycle’s service-manual values. Check that the tire clears the fork legs through a full rotation. I might be tempted to trust a close match, but “nearly fits” is a poor test. When measurements conflict, pause and confirm compatibility with a qualified motorcycle mechanic.

7 Tips for Buying a Front Motorcycle Spoke Wheel? - Start with OEM Fitment: Axle Diameter, Hub Width, Bearings, and Brake Offset

Tip What to Check How to Verify Why It Matters
1. Confirm axle diameter first Axle diameter and the front wheel’s bearing inner diameter (ID). Check the motorcycle’s service information or measure the axle with a suitable caliper. The bearing ID must match the axle size specified for the application. A wheel with the wrong axle or bearing ID will not install correctly. Do not assume that wheels with the same rim diameter share axle dimensions.
2. Compare hub width and spacer arrangement Hub width between the fork-side mounting faces, plus the position and length of any wheel spacers. Compare the wheel and spacer stack with the original assembly. Measure from the same reference faces and follow the service manual’s assembly method. Incorrect width or spacer placement can affect fork alignment, bearing loading, wheel centering, and brake-disc position.
3. Match bearing dimensions and type Bearing ID, outside diameter (OD), width, and specified bearing type. Use the wheel or motorcycle parts documentation to confirm all bearing dimensions. Replace bearings with the specified type; matching only the ID is not enough. The ID fits the axle, while the OD and width must suit the hub. An incorrect bearing may not seat properly or may fail under load.
4. Check brake-disc offset and mounting Rotor mounting pattern, bolt arrangement, rotor position, and offset from the wheel or hub centerline. Compare the original and replacement wheel using the same reference points. Confirm the rotor sits in the correct plane within the caliper and that the specified rotor hardware is compatible. Incorrect offset can misalign the rotor with the caliper. A matching bolt pattern alone does not confirm correct brake fitment.
5. Verify rim diameter and width Rim diameter, rim width, and compatibility with the tire size approved for the motorcycle. Check the wheel markings and the motorcycle or tire maker’s fitment information. Confirm that the selected tire is approved for that rim width and wheel diameter. Incorrect rim or tire sizing can change handling and clearance. Nominal tire size alone does not establish wheel compatibility.
6. Check spoke and hub construction Spoke count, lacing pattern, spoke condition, hub design, and suitability for the intended riding conditions. Inspect for bent, cracked, loose, or corroded spokes and damage around the spoke holes. Confirm that the wheel is assembled for the motorcycle’s required front-wheel configuration. Spokes distribute loads between the rim and hub. Damage, incorrect assembly, or unsuitable construction can compromise wheel strength and safety.
7. Confirm clearance and final fitment Clearance at the fork legs, brake caliper, fender, tire, and any speed-sensor components. Use the correct axle, spacers, rotor, and tire for a trial installation. After assembly, verify free wheel rotation and follow the specified torque and inspection procedures. A wheel that bolts on may still interfere with surrounding parts. Correct clearance and installation are essential before riding.

Fitment note: Dimensions and tolerances vary by motorcycle model and year. Treat the original equipment specification or service manual as the reference; generic measurements are not a substitute for model-specific fitment verification.


Decode Tire Size: 120/70 ZR17 Means 120-mm Width, 70% Aspect Ratio, and 17-in Rim

When a front spoke wheel listing says 120/70 ZR17, read each number before judging fit. The 120 is the tyre’s nominal section width in millimetres; 70 means sidewall height is 70% of that width, or about 84 mm. The 17 is the rim diameter in inches. These dimensions follow the tyre-designation conventions used in the ETRTO Standards Manual and UNECE Regulation No. 75. “R” identifies radial construction, while “Z” signals a high-speed category; check the tyre’s full service description for its specific speed and load ratings. Small markings matter.

That 84-mm figure is a nominal calculation, not a promise that every tyre measures exactly the same. Actual dimensions can vary with rim width and construction. A practical check: compare the wheel’s stamped rim size with the tyre maker’s approved rim-width range, then verify clearance at the fork and brake components. A tape measure helps, but it cannot confirm fit by itself. Spoke wheels may also require an inner tube unless the rim is designed and sealed for tubeless use. I have seen listings omit that detail. Don’t assume. Use the wheel manufacturer’s specifications and the motorcycle’s handbook together; if either gives a different size or load requirement, pause before ordering.

Match Rim Width to Tire Size Using ETRTO or JATMA Fitment Data

A front spoke wheel must suit the tire, not just the fork and brake assembly. Check the exact tire designation printed on its sidewall, including width, aspect ratio, and rim diameter. ETRTO’s Standards Manual and JATMA’s Year Book provide tire-to-rim fitment tables, including measuring rim widths and approved alternatives. Use the entry for your specific tire size. Close is not the same as correct.

For example, a 120/70-17 tire commonly uses a 3.50-inch measuring rim, equal to 88.9 mm. That figure describes the reference rim used for tire measurements; it does not, by itself, prove that every nearby rim width is approved. Check the relevant ETRTO or JATMA table for the permitted range. A rim that is too narrow or too wide can change the tire’s profile and contact patch. Small mismatch, real effect.

Before buying, compare the wheel’s stated rim width with the tire maker’s approved fitment data, then confirm the wheel’s diameter and offset. Also inspect spoke tension, rim runout, and the bead-seat area; a correct width cannot compensate for a damaged rim. I would not rely on a seller’s “fits most” note alone. It sounds convenient, but it leaves out the exact tire size and standard used. If the table or wheel marking is unclear, pause and verify it with a qualified motorcycle technician.

Verify Spoke Count, Gauge, and Lacing Against the Wheel Manufacturer’s Specifications

Before buying a front motorcycle spoke wheel, match its spoke count to the wheel manufacturer’s specification. Count the holes in both hub and rim; they should correspond. A wheel can look right and still be wrong. Check spoke diameter with calipers, not just a “gauge” label, since listings may use different descriptions. Confirm spoke length, head shape, and bend against the specified hub and rim. Small mismatches can make assembly difficult or leave uneven tension.

Lacing pattern matters too. Verify the specified crossing pattern and direction, then compare the layout with a reliable wheel diagram or service document. Do not assume the old wheel is correct; it may have been rebuilt with different parts. Measure spoke tension with a suitable tension meter when the maker provides a target. This detail is easy to overlook. I would not judge tension by sound alone; it can be a useful check, but not a measurement.

For context, the U.S. National Highway Traffic Safety Administration reported 6,218 motorcyclist fatalities in its 2022 Traffic Safety Facts: Motorcycles. That figure does not identify spoke-wheel failures, so it should not be treated as evidence about spoke risk. It does underline why fitment checks deserve care. Use the wheel manufacturer’s written specifications as the authority, and ask a qualified wheel builder when the count, diameter, or lacing instructions conflict. A second check is worth the time.

Check Tire Load and Speed Ratings Under FMVSS No. 119

When buying a front spoke wheel, match its approved tire size and load capacity to your motorcycle’s manual. FMVSS No. 119, codified at 49 CFR §571.119, sets performance and marking requirements for tires used on motorcycles and other non-passenger vehicles. Read the tire sidewall: check its size, load information, and speed symbol. The wheel itself also needs a compatible load rating. A compliant tire is not automatically the right fit.

NHTSA’s 2022 Traffic Safety Facts reported 6,218 motorcyclist deaths, or 15% of all traffic fatalities that year. That figure is not proof that tire ratings prevent crashes, but it underscores why fitment deserves care. Compare the tire’s load and speed ratings with the motorcycle maker’s specifications; don’t substitute a higher-looking number without checking compatibility. Set cold pressure to the manual’s recommendation, not the sidewall maximum, which describes the tire’s limit. Numbers matter. Spoke tension and rim condition matter, too, but they cannot compensate for an unsuitable tire. I still find sidewall codes easy to misread, so verify unclear markings with a qualified tire professional before purchase.

Powder Coat Booths

For those larger-sized parts, or smaller quantity runs, we have 2 independent powder coat booths and ovens. The quality, durability and affordability of today’s powder coating finishes make this the process of choice for world-class companies.

Powder coating advantages over other forms of coating are many. Materials used in the Powder coating process can be metals and non-metals that come in a multitude of thicknesses, textures, colors, etc. Another of Powder coating’s biggest advantages over conventional coatings is its ability to create finishes in many different textures. Powder Coating Booths allow us the ability to apply these advantages to large products.

Wet Paint Line

Tri-State Fabricators runs a full-service conveyor line for painting. Wet painting can provide protection or decoration to many different part styles. From start to finish, every project is easier to undergo random and point-based inspection by our skilled painting team.

Advantages to our Wet Paint Line are these lines start with product prep and ends with a thorough inspection of a high quality finished product. Our ability to complete large and small projects with a superior finish and doing so in a timely and economical fashion. This passes along the savings in production to our customers. When powder coating ins not an option, our Wet Paint Line gets the job done right the first time.

Wet Paint Booths

When the parts get big and heavy we roll-out our custom paint racks and oversize booth. By utilizing our partnerships with all the major paint brands, we can match virtually any color with wet paint.

The advantages of having access to a Wet Paint Booth are many. Large projects of many different shapes can be loaded into the booth. The Wet Paint Booth offers an environment that is much more controlled than a typical parts painting operation.

Not only are they used because of their controlled environment, but they’re are also advantageous when it comes to applying paint to parts that are needed in industries that require specialty coatings such as medical, aerospace, etc.

Military CARC

Our military forces have some very high standards when it comes to the finish of their vehicles and equipment. From the first pre-treatment step to final coat, it takes a great deal of knowledge and experience to protect the men and women of our armed forces. They deserve only the best, and Tri-State Fabricators provides it.

All of our processes are closely monitored by our staff and management teams. Both of which are highly trained in the processes of metal fabrication and finishing. Tri-State Fabricators’ goal is to always fully satisfy each and every customer, including the military. We will always put a 110% into what we do.

Glass-Bead Blasting

Abrasive media blasting is an excellent way to remove old paint, rust, and increase the paint/powder adhesion. Glass beads produce a much smoother and brighter finish than angular abrasives; leaving the part clean yet without any dimensional change. Chemically inert and environmentally friendly, we can recycle our beads approximately 30 times; making them a more preferred method of metal cleaning or surface finishing.

Advantages to Glass Bead Blasting are many. Glass bead blast media is used when a project is needing rough surfaces need to become smooth for applications of coatings such as paint. It is typically used to clean paint and rust from a product surface without deforming the surface it is being used on. Overall, compared to many other blasting media, Glass Bead Blasting is a very economical choice and those savings are always passed on to our customers.

Part Washing

Tri-State Fabricators utilize a zinc phosphate wash to clean and etch the material to ensure the best paint adhesion possible. The unique design of our 3-stage wash system does the work like a 5-stage. From Cleaning and rinsing to conversion coating and post-treatment, Our Part Washing process is a complete service and works throughout the fabrication service and the finishing service.

Along with the previously mentioned benefits, Curing is a vital chemical reaction that leaves the product finish hard and relatively safe from mild abrasion and aggressive corrosion. This process can be done in more than one way; ambient air-dry or in curing ovens at temps that exceed 240°.

Burn-Off Oven

From fixing paint mistakes (someone else’s of course) to simply cleaning our paint line hooks, our burn-off oven is put to good use. After a quick burn-off, a little clean up, and a fresh coat of paint, your parts will look better than new.

Why does our Burn-Off Oven work so well? Because super heating the air around parts turns the materials into ashes. From paint and powder coatings to rubber and machining oils, high temps do the job without degrading the integrity of the part.

Masking

Masking is a vital part of producing high quality products. We have die-cut masking patterns to protect machined surfaces as well as a wide range of plugs and caps to protect threaded holes and bolts. We provide permanent and temporary masking.

Masking allows the selected sections of a product to be protected from a fabrication or finishing service. This can be with both chemicals when etching and tapes, paints when only finishing just a section of the product. Masking is great in aiding the customization process of a project.

Screen Printing

Screen printing is a photographic process that transfers artwork onto a porous nylon screen which allows colored ink to flow through the screen and be deposited on an aluminum or plastic component. We can generally have just about any design created onto a screen for your parts.

Some of the advantages of Screen Printing are, brand recognition for your business displaying on your products, assembly instructions, product warnings/hazards, etc. Tri-State Fabricators produces Screen Printing of the highest quality so you know it’s durable.

Metal Finishing

Metal Finishing is the art of treating the exterior portion of product, often metal but can also be made of other materials, so that the surface is clean and free of any debris. Then the process of applying coats or either paint of powder coat takes place. This coating process improves the quality of the product in both appearance and resistance to wear and corrosion.

Tri-State Fabricators, Inc., understands that a project typically isn’t complete until a high-quality finish has been added to your product. This is why our painting and powder coating teams continuously inspect the products throughout the Metal Finishing process.
