


What Is HDD Horizontal Drilling and How Does It Work?

Hdd Horizontal Drilling lets crews install underground pipes and conduits while keeping the surface largely undisturbed. Instead of opening a continuous trench, a drill rig creates a guided path beneath roads, landscaped areas, or waterways. The method can reduce surface disruption, but it still demands careful planning.

HDD specialist James H. Barritt has written about the method and its field practices. The following is a paraphrase of those practical principles, not a verified verbatim quotation: “A reliable bore depends on planning, steering, and understanding the ground.” That distinction matters. Soil and rock conditions can change over a short distance, and no route behaves perfectly.

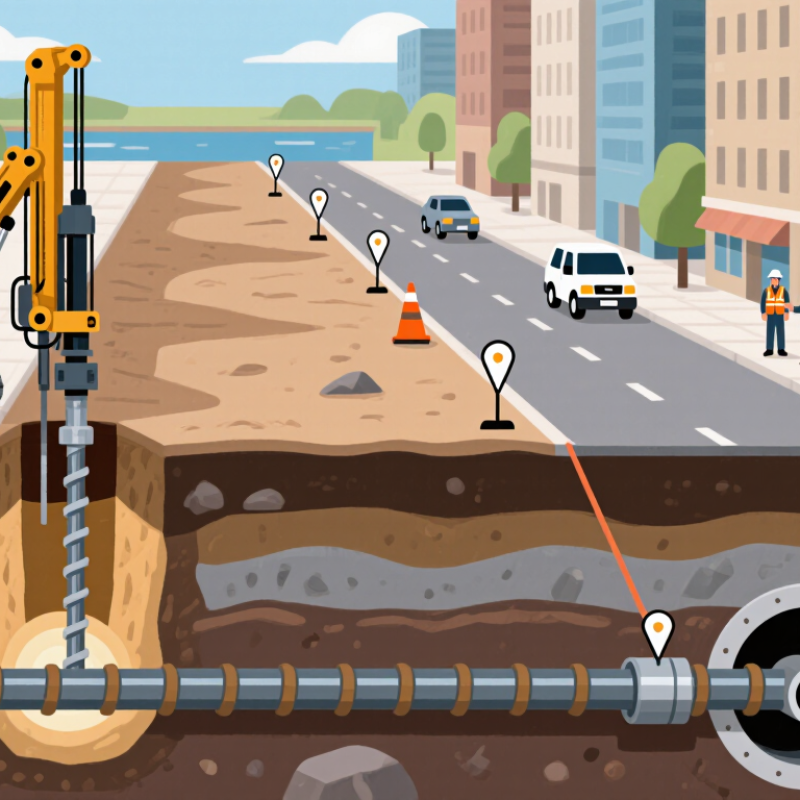
A typical installation begins with a planned entry and exit point. The crew drills a small pilot bore, tracking its position with locating equipment. The drill head can be steered to follow the designed alignment. After it reaches the exit, the crew attaches the product pipe and pulls it back through the enlarged bore. Simple in outline. Technical in practice.

This guide explains the equipment, drilling stages, tracking, and site factors that shape an HDD project. It also looks at common limitations, including changing ground conditions and the need to manage drilling fluid. Plans help, but they do not remove uncertainty. A useful explanation should show both what the process can do and where careful judgment remains essential.
What Is HDD Horizontal Drilling and How Does It Work?

HDD Fundamentals: A Trenchless Method for Installing Underground Utilities

What Is HDD Horizontal Drilling and How Does It Work?

HDD Fundamentals: A Trenchless Method for Installing Underground Utilities

Horizontal directional drilling, or HDD, installs underground pipes and cables with limited surface excavation. It is useful beneath roads, driveways, and landscaped areas where an open trench would cause disruption. A crew drills a small pilot bore along a planned path. A locating system tracks the drill head and helps the operator guide it around obstacles. Ground conditions matter.

After the pilot bore reaches its exit point, the crew may enlarge the hole with a reamer. The utility line is then attached and pulled back through the bore. Drilling fluid helps carry soil cuttings out and supports the bore, but its behavior depends on the soil. Sand, cobbles, and unexpected fill can complicate the work. Plans can be imperfect; careful site checks and ongoing tracking help crews respond before small deviations become costly problems.


Plan the Bore: Map Utilities, Ground Conditions, and the Intended Alignment

Before horizontal directional drilling (HDD), map the bore against actual site conditions, not just a straight line on a screen. Gather available utility records and arrange a field locate to mark buried services. Check entry and exit areas, nearby structures, and clearance at each crossing. Records may be incomplete, so treat them as clues rather than proof. Small details matter.

Ground conditions influence the route and drilling plan. Review geotechnical information for soil layers, rock, groundwater, and possible obstructions. Where information is limited, targeted site investigation can reduce uncertainty. Set the intended alignment with practical depth and bend limits in mind, and confirm that the exit point is accessible for receiving the drill head. A carefully drawn route can still miss local changes in soil; revise it when field evidence calls for a closer look.

Tips: Walk the alignment before work begins. Compare marked utilities with the plan, and pause if locations conflict. Do not guess. Document changes so the crew works from the same, current route.

Check Pipe Curvature: HDPE Bend Radius Is Often 25–40× Outside Diameter

In HDD horizontal drilling, the bore path bends beneath roads, driveways, or other obstacles. HDPE pipe must follow that path without being forced into a sharper curve than it can safely tolerate. A common planning range for minimum bend radius is 25–40 times the pipe’s outside diameter. For a 110 mm pipe, that suggests roughly 2.75–4.4 m. The exact limit depends on pipe design and installation conditions.

Check the pipe supplier’s guidance before setting the bore profile. SDR, temperature, handling, and pulling loads can all affect allowable curvature. Cold HDPE may be less flexible, while a tight bend can cause kinking or add stress during pullback. Measure it twice. A gentle curve on a drawing may look different in a crowded work area, where entry pits and existing utilities restrict the setup.

Keep the planned radius visible in the drilling layout, and inspect the pipe as it enters the bore. Watch for flattening, scuffing, or a bend that tightens near the entry point. If the route cannot maintain the required radius, adjust the bore path or installation plan rather than forcing the pipe. Field measurements are useful, but they are not a substitute for the pipe’s rated limits. Even careful estimates can miss a constraint. That deserves a second look.

HDPE Pipe Bend Radius: How Outside Diameter Affects the Curve

A commonly used planning range for HDPE pipe bend radius is about 25–40 times its outside diameter (OD). The bars show the corresponding radius range for each pipe size. Actual limits depend on pipe specifications, temperature, installation conditions, and project requirements; confirm the permitted bend radius before installation.

Drill and Ream: Create a Pilot Bore, Then Enlarge It to the Required Size

What Is HDD Horizontal Drilling and How Does It Work?

Drill and Ream: Create a Pilot Bore, Then Enlarge It to the Required Size

The process starts with a steerable drill head that cuts a narrow pilot bore along the planned route. A locator tracks the head’s depth and direction, while the operator adjusts its path around obstacles. Small details matter. A shallow change in pitch can affect where the bore emerges, so crews check tracking readings throughout the drill.

The pilot bore is usually too small for the product pipe. Crews attach a reamer and pull it back through the bore, enlarging the opening; they may repeat this in stages. NASTT’s HDD Good Practices Guidelines describe bore sizing as dependent on ground conditions and product dimensions. A common planning range is about 1.2 to 1.5 times the product’s outside diameter. For a 300 mm pipe, that suggests a bore of roughly 360–450 mm, though the right size depends on soil, fluid circulation, and pullback needs. Not a fixed rule. ASTM F1962-22 also emphasizes designing HDD installations around site conditions and installation forces. In practice, an experienced crew watches for changing torque, poor returns, or unstable ground. These signs can call for a slower reaming pass or a revised plan. Reaming is not just making a larger hole; it is managing the space and support needed for a controlled pullback.

Pull Back and Verify: Install the Product Pipe in HDD’s Third Core Stage

After the pilot bore is enlarged, the product pipe is attached behind a reamer and swivel. The HDD rig then pulls the assembly back through the bore. This is the third core stage, but it is not simply a matter of applying more force. The crew watches pullback force, drilling-fluid returns, and pipe movement throughout the operation. A sudden force increase or a loss of returns can signal trouble underground.

Pipe capacity needs checking before the pull begins. The Plastics Pipe Institute’s Handbook of Polyethylene Pipe explains that allowable pulling load depends on pipe wall area and tensile stress, not diameter alone. For example, a 250 mm outside-diameter pipe at SDR 11 has a nominal wall thickness of about 22.7 mm, before manufacturing tolerances. ASTM F1962 provides an engineering method for estimating pull forces during PE pipe installation by HDD. These calculations help set limits; they do not replace live monitoring.

Keep the pipe clean and supported at the entry pit. The swivel should prevent reamer rotation from twisting the product pipe. Record pull force and fluid returns at regular intervals, then inspect the exposed pipe for scoring, kinks, or damage. Verify the installed route and elevation against the bore plan, and complete the specified pressure or leak test. A smooth pull is reassuring, not proof of a sound installation. That distinction is easy to overlook.

Powder Coat Booths

For those larger-sized parts, or smaller quantity runs, we have 2 independent powder coat booths and ovens. The quality, durability and affordability of today’s powder coating finishes make this the process of choice for world-class companies.

Powder coating advantages over other forms of coating are many. Materials used in the Powder coating process can be metals and non-metals that come in a multitude of thicknesses, textures, colors, etc. Another of Powder coating’s biggest advantages over conventional coatings is its ability to create finishes in many different textures. Powder Coating Booths allow us the ability to apply these advantages to large products.

Wet Paint Line

Tri-State Fabricators runs a full-service conveyor line for painting. Wet painting can provide protection or decoration to many different part styles. From start to finish, every project is easier to undergo random and point-based inspection by our skilled painting team.

Advantages to our Wet Paint Line are these lines start with product prep and ends with a thorough inspection of a high quality finished product. Our ability to complete large and small projects with a superior finish and doing so in a timely and economical fashion. This passes along the savings in production to our customers. When powder coating ins not an option, our Wet Paint Line gets the job done right the first time.

Wet Paint Booths

When the parts get big and heavy we roll-out our custom paint racks and oversize booth. By utilizing our partnerships with all the major paint brands, we can match virtually any color with wet paint.

The advantages of having access to a Wet Paint Booth are many. Large projects of many different shapes can be loaded into the booth. The Wet Paint Booth offers an environment that is much more controlled than a typical parts painting operation.

Not only are they used because of their controlled environment, but they’re are also advantageous when it comes to applying paint to parts that are needed in industries that require specialty coatings such as medical, aerospace, etc.

Military CARC

Our military forces have some very high standards when it comes to the finish of their vehicles and equipment. From the first pre-treatment step to final coat, it takes a great deal of knowledge and experience to protect the men and women of our armed forces. They deserve only the best, and Tri-State Fabricators provides it.

All of our processes are closely monitored by our staff and management teams. Both of which are highly trained in the processes of metal fabrication and finishing. Tri-State Fabricators’ goal is to always fully satisfy each and every customer, including the military. We will always put a 110% into what we do.

Glass-Bead Blasting

Abrasive media blasting is an excellent way to remove old paint, rust, and increase the paint/powder adhesion. Glass beads produce a much smoother and brighter finish than angular abrasives; leaving the part clean yet without any dimensional change. Chemically inert and environmentally friendly, we can recycle our beads approximately 30 times; making them a more preferred method of metal cleaning or surface finishing.

Advantages to Glass Bead Blasting are many. Glass bead blast media is used when a project is needing rough surfaces need to become smooth for applications of coatings such as paint. It is typically used to clean paint and rust from a product surface without deforming the surface it is being used on. Overall, compared to many other blasting media, Glass Bead Blasting is a very economical choice and those savings are always passed on to our customers.

Part Washing

Tri-State Fabricators utilize a zinc phosphate wash to clean and etch the material to ensure the best paint adhesion possible. The unique design of our 3-stage wash system does the work like a 5-stage. From Cleaning and rinsing to conversion coating and post-treatment, Our Part Washing process is a complete service and works throughout the fabrication service and the finishing service.

Along with the previously mentioned benefits, Curing is a vital chemical reaction that leaves the product finish hard and relatively safe from mild abrasion and aggressive corrosion. This process can be done in more than one way; ambient air-dry or in curing ovens at temps that exceed 240°.

Burn-Off Oven

From fixing paint mistakes (someone else’s of course) to simply cleaning our paint line hooks, our burn-off oven is put to good use. After a quick burn-off, a little clean up, and a fresh coat of paint, your parts will look better than new.

Why does our Burn-Off Oven work so well? Because super heating the air around parts turns the materials into ashes. From paint and powder coatings to rubber and machining oils, high temps do the job without degrading the integrity of the part.

Masking

Masking is a vital part of producing high quality products. We have die-cut masking patterns to protect machined surfaces as well as a wide range of plugs and caps to protect threaded holes and bolts. We provide permanent and temporary masking.

Masking allows the selected sections of a product to be protected from a fabrication or finishing service. This can be with both chemicals when etching and tapes, paints when only finishing just a section of the product. Masking is great in aiding the customization process of a project.

Screen Printing

Screen printing is a photographic process that transfers artwork onto a porous nylon screen which allows colored ink to flow through the screen and be deposited on an aluminum or plastic component. We can generally have just about any design created onto a screen for your parts.

Some of the advantages of Screen Printing are, brand recognition for your business displaying on your products, assembly instructions, product warnings/hazards, etc. Tri-State Fabricators produces Screen Printing of the highest quality so you know it’s durable.

Metal Finishing

Metal Finishing is the art of treating the exterior portion of product, often metal but can also be made of other materials, so that the surface is clean and free of any debris. Then the process of applying coats or either paint of powder coat takes place. This coating process improves the quality of the product in both appearance and resistance to wear and corrosion.

Tri-State Fabricators, Inc., understands that a project typically isn’t complete until a high-quality finish has been added to your product. This is why our painting and powder coating teams continuously inspect the products throughout the Metal Finishing process.
