What Is an Electrical Plug Lockout and How Does It Work?

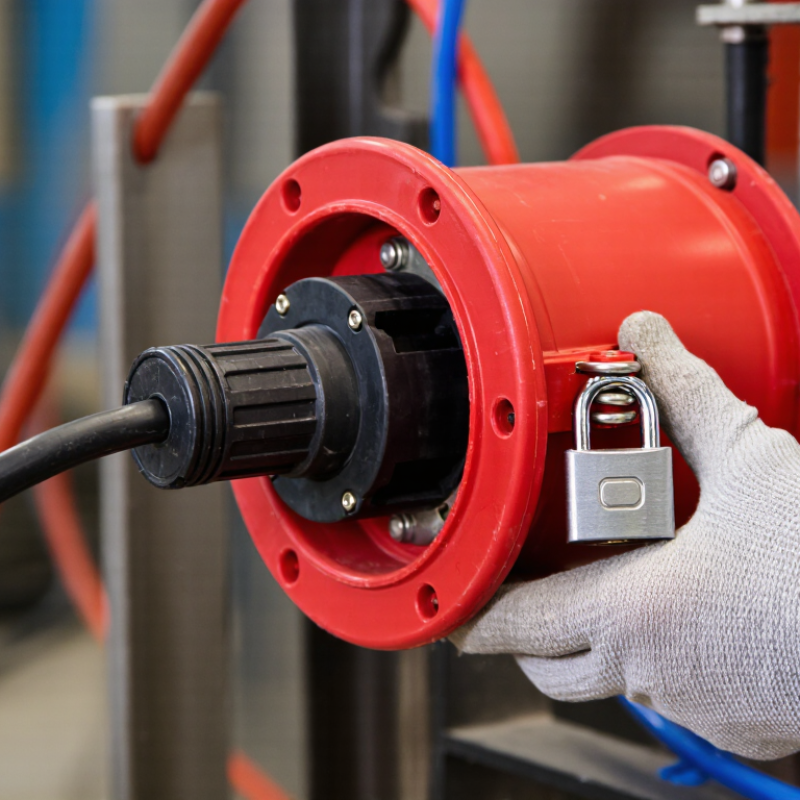
An Electrical Plug Lockout is a small device with an important job: it keeps a plug from being reconnected while equipment is being serviced. The lockout fits over or around the plug, then accepts a padlock. With the plug enclosed and secured, someone cannot simply push it back into a wall outlet or extension cord. The device’s size and shape vary, so the plug, cord, and lockout must be compatible.

“Lockout/tagout is about controlling hazardous energy before work begins.” This is a practical summary of OSHA’s energy-control guidance, not a quotation from a named individual. A reliable introduction should not assign invented words to an expert. OSHA’s standard on the control of hazardous energy explains the broader principle: equipment must be isolated and protected against unexpected energization during servicing.

In practice, a worker shuts down the equipment, disconnects its plug, places the plug inside the lockout, and applies a personal lock. A tag can identify who applied it and why. The worker then verifies that the equipment cannot start before beginning the task. That check matters. A plug lockout is not a universal fix, and it does not control every energy source, such as stored electrical energy or a separate power feed. Select a device that fits securely, follow the equipment’s energy-control procedure, and inspect the setup. The cover may look simple. The verification is not optional.

What Is an Electrical Plug Lockout and How Does It Work?

What an Electrical Plug Lockout Is

What Is an Electrical Plug Lockout and How Does It Work?

What an Electrical Plug Lockout Is

An electrical plug lockout is a protective enclosure for a disconnected power plug. It prevents the plug from entering an outlet during servicing or maintenance. The device usually surrounds the plug body and includes a hole for a padlock. Some designs also display a warning label near the lock point.

Its purpose is clear: control the plug, not merely warn people. Under OSHA 1910.147, cord-and-plug equipment may qualify for an exception when the plug remains under the employee’s exclusive control. A lockout provides stronger physical control when several workers share the area. A label alone is not enough.

The mechanism is simple. An authorized worker switches off the equipment, disconnects the plug, places it inside the lockout, and attaches a personal lock. The worker then tries the start control and verifies that no energy remains. Stored electrical energy can still exist in capacitors or connected equipment. That detail is easy to miss.

The U.S. Bureau of Labor Statistics recorded 145 fatal occupational injuries involving electricity exposure in 2022. This figure supports disciplined isolation, although a plug lockout cannot solve every electrical hazard. It does not isolate hardwired circuits or prevent energy from another source. A competent assessment is still necessary. In practice, workers sometimes rush verification. That habit deserves review.

What Is an Electrical Plug Lockout and How Does It Work?

An electrical plug lockout is a safety device that encloses an unplugged electrical plug and prevents it from being inserted into a power source. The chart shows the maximum nominal voltage associated with several common plug configurations that may require a suitably sized lockout device.

A plug lockout does not replace verification of zero energy. After disconnecting the plug, authorized personnel should secure it inside the lockout, apply a personal lock and identification tag, and verify that the equipment cannot operate. Voltage values are based on common North American plug configuration ratings; actual lockout compatibility depends on plug dimensions and the device manufacturer’s specifications.

Reference basis: ANSI/NEMA WD 6 plug and receptacle configuration ratings; OSHA 29 CFR 1910.147 lockout/tagout principles.

Common Types and Main Components of Plug Lockout Devices

What Is an Electrical Plug Lockout and How Does It Work?

An electrical plug lockout prevents a plug from entering a power source during maintenance. It covers the plug body and blocks access to the receptacle. Most devices use a rigid, nonconductive shell with a hinged or sliding closure. A padlock passes through reinforced locking holes. Some models also accept a group lock hasp. This allows several authorized workers to control one energy source. The device should fit tightly around the plug, cord entrance, and housing.

Common types include enclosed plug lockouts, adjustable cable lockouts, and universal outlet covers. Enclosed designs suit standard molded plugs and provide strong physical protection. Adjustable models use a flexible cable, clamp, or screw mechanism for unusual plug shapes. Universal covers can protect wall outlets, extension connections, or oversized configurations. Compatibility matters. A loose fit can leave enough space for accidental reconnection.

Key components include the lockout body, closure mechanism, cable channel, locking holes, and warning label. Many units include a durable tag for the worker’s name and service details. The label is easy to ignore. That is a mistake. In maintenance inspections, unclear identification often creates delays and confusion. Inspectors should check cracks, worn hinges, damaged labels, and blocked locking holes before use. The plug must be disconnected, verified as de-energized, and secured against reconnection. Some procedures feel repetitive. They still prevent dangerous assumptions.

How a Plug Lockout Prevents Electrical Reconnection

What Is an Electrical Plug Lockout and How Does It Work?

An electrical plug lockout prevents a disconnected plug from being reinserted during maintenance. The device encloses the plug and accepts a personal lock and warning tag. A worker first switches off the equipment, removes the plug, and places it inside the lockout housing. The locked enclosure blocks physical access to the outlet.

This simple barrier targets the most common reconnection mistake: someone restores power without knowing that work continues. OSHA’s FY 2023 Top 10 list recorded 2,554 lockout/tagout violations, ranking the hazard sixth among cited workplace safety issues. The figure shows why isolation must be visible, controlled, and verifiable. A tag alone warns people. A lockout creates a physical obstacle.

Verification still matters. A qualified worker should test the circuit with a properly rated instrument before touching conductors or removing guards. The test should confirm the expected zero-energy condition, not merely show that the plug is absent. Some equipment may have stored electrical energy, alternate feeds, or control circuits. A plug lockout cannot control those sources by itself. That limitation is easy to overlook.

In field practice, the lockout works best when each authorized worker applies a personal lock. The procedure should identify the equipment, isolation point, responsible worker, and release steps. Keep the plug visible. Keep the key controlled. Small gaps in these steps can defeat good hardware. That is the uncomfortable part. Safety depends on behavior, not the device alone.

Steps for Applying and Removing a Plug Lockout

An electrical plug lockout is a protective device that encloses a plug and prevents reconnection. It usually accepts a padlock and safety tag. The locked enclosure blocks access to the outlet or plug connection. It does not remove stored electrical energy by itself. A qualified worker must assess the equipment and its energy sources.

Applying the lockout begins with identifying the correct equipment and reviewing its shutdown procedure. Notify affected workers before switching the equipment off. Disconnect the plug from its outlet. Check for damaged cords, exposed conductors, or heat marks. Do not continue if the plug is unsafe. Place the disconnected plug inside the lockout device. Close the cover fully, then attach a personal lock and a clear tag. The tag should show the worker’s name, date, and reason for isolation. Try the normal start control. Nothing should operate. A qualified person should also verify zero voltage with a properly rated tester when the equipment design requires it. One detail is easy to miss: stored energy may remain in capacitors or connected systems.

Removing the lockout requires equal care. Inspect the equipment and remove tools, guards, and temporary materials. Confirm that every worker is outside the danger area. Each person should remove their own lock whenever possible. Notify affected workers before restoring power. Remove the plug lockout, reconnect the plug, and test the equipment under controlled conditions. If the process feels rushed, stop and review it. Small oversights can defeat a careful lockout.

What Is an Electrical Plug Lockout and How Does It Work? - Steps for Applying and Removing a Plug Lockout

Topic Practical Details Safety Check
What it is A plug lockout is a device that encloses or secures an electrical plug so it cannot be inserted into an outlet while equipment is being serviced or maintained. Choose a device designed for the plug’s shape and size, and follow its instructions.
How it works The plug is disconnected from its receptacle and placed inside the lockout device. The device is closed and secured with a personal lock, preventing access to the plug. A lockout device does not, by itself, prove that equipment is de-energized. Verify the equipment’s safe condition using the applicable procedure.
Before applying Identify the equipment and its energy sources. Notify affected employees, shut the equipment down using its normal controls, and disconnect the plug. Follow the site’s energy-control procedure and the equipment manufacturer’s instructions. Do not disconnect a plug under load unless the equipment is designed for it.
Step 1: Prepare Confirm that the correct plug and energy source have been identified, and that the lockout device is suitable and undamaged. Stop if the plug, cord, receptacle, or lockout device is damaged or the energy source is uncertain.
Step 2: Shut down and disconnect Use the normal stopping procedure, then unplug the equipment. Hold the plug—not the cord—when removing it from the receptacle. Keep clear of moving parts and other hazards during shutdown. Never pull the plug out by its cord.
Step 3: Secure the plug Place the unplugged plug fully inside the compatible plug lockout. Close the device and attach the authorized worker’s personal lock and identification tag. Check that the device is closed securely and the plug cannot be removed or reconnected while locked.
Step 4: Verify isolation Use the equipment’s established verification procedure before beginning work. Where appropriate, attempt a normal start after ensuring it is safe to do so, then return controls to the off position. Verification must be performed by a qualified person using the method required for the equipment and task. Do not rely only on a tag or indicator light.
During the work Keep the lockout in place for the duration of the work. Each authorized worker should apply their own lock when required by the site’s group lockout procedure. Do not bypass, borrow, or remove another person’s lock. Control other energy sources, such as stored electrical or mechanical energy, as required.
Step 5: Prepare for removal Complete the work, reinstall guards and protective devices, account for tools and materials, and make sure employees are clear of the equipment. Notify affected employees before restoring energy, in accordance with the applicable procedure.
Step 6: Remove the lockout Each worker removes their own personal lock and tag. Open the device and remove the plug only after the area and equipment are ready for restoration. Removal by someone other than the person who applied the lock should occur only under a documented procedure consistent with applicable requirements.
Step 7: Restore power Reconnect the plug, restore energy using the prescribed startup procedure, and confirm the equipment operates as intended. Keep people clear of hazards during restart and report any abnormal condition before returning equipment to service.
Important limitation Some workplace rules allow an unplugged cord-and-plug-connected machine to be serviced without a separate lockout device when the plug remains under the exclusive control of the employee performing the work. Requirements depend on the applicable regulations, workplace energy-control program, and task. Follow the stricter applicable procedure; do not assume this exception applies.

Reminder: Plug lockout is one part of an energy-control process. Follow applicable regulations, workplace procedures, and manufacturer instructions; use qualified personnel for electrical work.

Safety Checks and Device Selection Considerations

An electrical plug lockout prevents a plug from entering an energized socket during maintenance. It encloses the plug and accepts a safety lock, warning others not to reconnect power. This simple barrier matters. OSHA reports that uncontrolled hazardous energy causes about 50,000 injuries and 120 deaths each year in the United States. The U.S. Bureau of Labor Statistics recorded 145 workplace electrocutions in 2022.

Safety checks should begin before selecting any device. Identify every energy source, including backup supplies, capacitors, and nearby circuits. Switch off the equipment, unplug it, and verify zero voltage with a properly rated tester. Test the instrument on a known live source before and after testing. That small step is often missed. Do not rely on a control switch alone.

Device selection requires careful measurement. Check plug dimensions, cable diameter, voltage rating, and the available lock-hole size. The enclosure should resist cracking, tampering, and accidental removal. It must fit securely without crushing the cable. Consider temperature, dust, moisture, and restricted work areas. A universal-looking device may not fit every plug. That assumption deserves review. Select locks and tags that remain visible under poor lighting, and ensure authorized workers can apply them individually. OSHA’s lockout/tagout guidance also requires procedures, training, and periodic inspections, not just hardware. A lockout device is only effective when the energy-control process is understood, verified, and consistently followed.

Powder Coat Booths

For those larger-sized parts, or smaller quantity runs, we have 2 independent powder coat booths and ovens. The quality, durability and affordability of today’s powder coating finishes make this the process of choice for world-class companies.

Powder coating advantages over other forms of coating are many. Materials used in the Powder coating process can be metals and non-metals that come in a multitude of thicknesses, textures, colors, etc. Another of Powder coating’s biggest advantages over conventional coatings is its ability to create finishes in many different textures. Powder Coating Booths allow us the ability to apply these advantages to large products.

Wet Paint Line

Tri-State Fabricators runs a full-service conveyor line for painting. Wet painting can provide protection or decoration to many different part styles. From start to finish, every project is easier to undergo random and point-based inspection by our skilled painting team.

Advantages to our Wet Paint Line are these lines start with product prep and ends with a thorough inspection of a high quality finished product. Our ability to complete large and small projects with a superior finish and doing so in a timely and economical fashion. This passes along the savings in production to our customers. When powder coating ins not an option, our Wet Paint Line gets the job done right the first time.

Wet Paint Booths

When the parts get big and heavy we roll-out our custom paint racks and oversize booth. By utilizing our partnerships with all the major paint brands, we can match virtually any color with wet paint.

The advantages of having access to a Wet Paint Booth are many. Large projects of many different shapes can be loaded into the booth. The Wet Paint Booth offers an environment that is much more controlled than a typical parts painting operation.

Not only are they used because of their controlled environment, but they’re are also advantageous when it comes to applying paint to parts that are needed in industries that require specialty coatings such as medical, aerospace, etc.

Military CARC

Our military forces have some very high standards when it comes to the finish of their vehicles and equipment. From the first pre-treatment step to final coat, it takes a great deal of knowledge and experience to protect the men and women of our armed forces. They deserve only the best, and Tri-State Fabricators provides it.

All of our processes are closely monitored by our staff and management teams. Both of which are highly trained in the processes of metal fabrication and finishing. Tri-State Fabricators’ goal is to always fully satisfy each and every customer, including the military. We will always put a 110% into what we do.

Glass-Bead Blasting

Abrasive media blasting is an excellent way to remove old paint, rust, and increase the paint/powder adhesion. Glass beads produce a much smoother and brighter finish than angular abrasives; leaving the part clean yet without any dimensional change. Chemically inert and environmentally friendly, we can recycle our beads approximately 30 times; making them a more preferred method of metal cleaning or surface finishing.

Advantages to Glass Bead Blasting are many. Glass bead blast media is used when a project is needing rough surfaces need to become smooth for applications of coatings such as paint. It is typically used to clean paint and rust from a product surface without deforming the surface it is being used on. Overall, compared to many other blasting media, Glass Bead Blasting is a very economical choice and those savings are always passed on to our customers.

Part Washing

Tri-State Fabricators utilize a zinc phosphate wash to clean and etch the material to ensure the best paint adhesion possible. The unique design of our 3-stage wash system does the work like a 5-stage. From Cleaning and rinsing to conversion coating and post-treatment, Our Part Washing process is a complete service and works throughout the fabrication service and the finishing service.

Along with the previously mentioned benefits, Curing is a vital chemical reaction that leaves the product finish hard and relatively safe from mild abrasion and aggressive corrosion. This process can be done in more than one way; ambient air-dry or in curing ovens at temps that exceed 240°.

Burn-Off Oven

From fixing paint mistakes (someone else’s of course) to simply cleaning our paint line hooks, our burn-off oven is put to good use. After a quick burn-off, a little clean up, and a fresh coat of paint, your parts will look better than new.

Why does our Burn-Off Oven work so well? Because super heating the air around parts turns the materials into ashes. From paint and powder coatings to rubber and machining oils, high temps do the job without degrading the integrity of the part.

Masking

Masking is a vital part of producing high quality products. We have die-cut masking patterns to protect machined surfaces as well as a wide range of plugs and caps to protect threaded holes and bolts. We provide permanent and temporary masking.

Masking allows the selected sections of a product to be protected from a fabrication or finishing service. This can be with both chemicals when etching and tapes, paints when only finishing just a section of the product. Masking is great in aiding the customization process of a project.

Screen Printing

Screen printing is a photographic process that transfers artwork onto a porous nylon screen which allows colored ink to flow through the screen and be deposited on an aluminum or plastic component. We can generally have just about any design created onto a screen for your parts.

Some of the advantages of Screen Printing are, brand recognition for your business displaying on your products, assembly instructions, product warnings/hazards, etc. Tri-State Fabricators produces Screen Printing of the highest quality so you know it’s durable.

Metal Finishing

Metal Finishing is the art of treating the exterior portion of product, often metal but can also be made of other materials, so that the surface is clean and free of any debris. Then the process of applying coats or either paint of powder coat takes place. This coating process improves the quality of the product in both appearance and resistance to wear and corrosion.

Tri-State Fabricators, Inc., understands that a project typically isn’t complete until a high-quality finish has been added to your product. This is why our painting and powder coating teams continuously inspect the products throughout the Metal Finishing process.